
DIY Chicken Bath | Safe and Effective Bath Tub For Your Backyard Chickens
Creating a safe and convenient bath for your chickens is easier than you might think! With just a few materials and tools, you can make a practical and safe bath container for your flock.
Why a Chicken Bath?

Baths are an important part of keeping your chickens healthy and happy. You can use a chicken bath for multiple reasons: to remove dried poop from feathers, as a solution for egg binding or bumble foot and to tackle parasites such as scaly leg mites and lice. A well-maintained chicken bath can greatly contribute to your chicken’s overall well-being.
Step-by-step DIY Chicken Bath Guide:
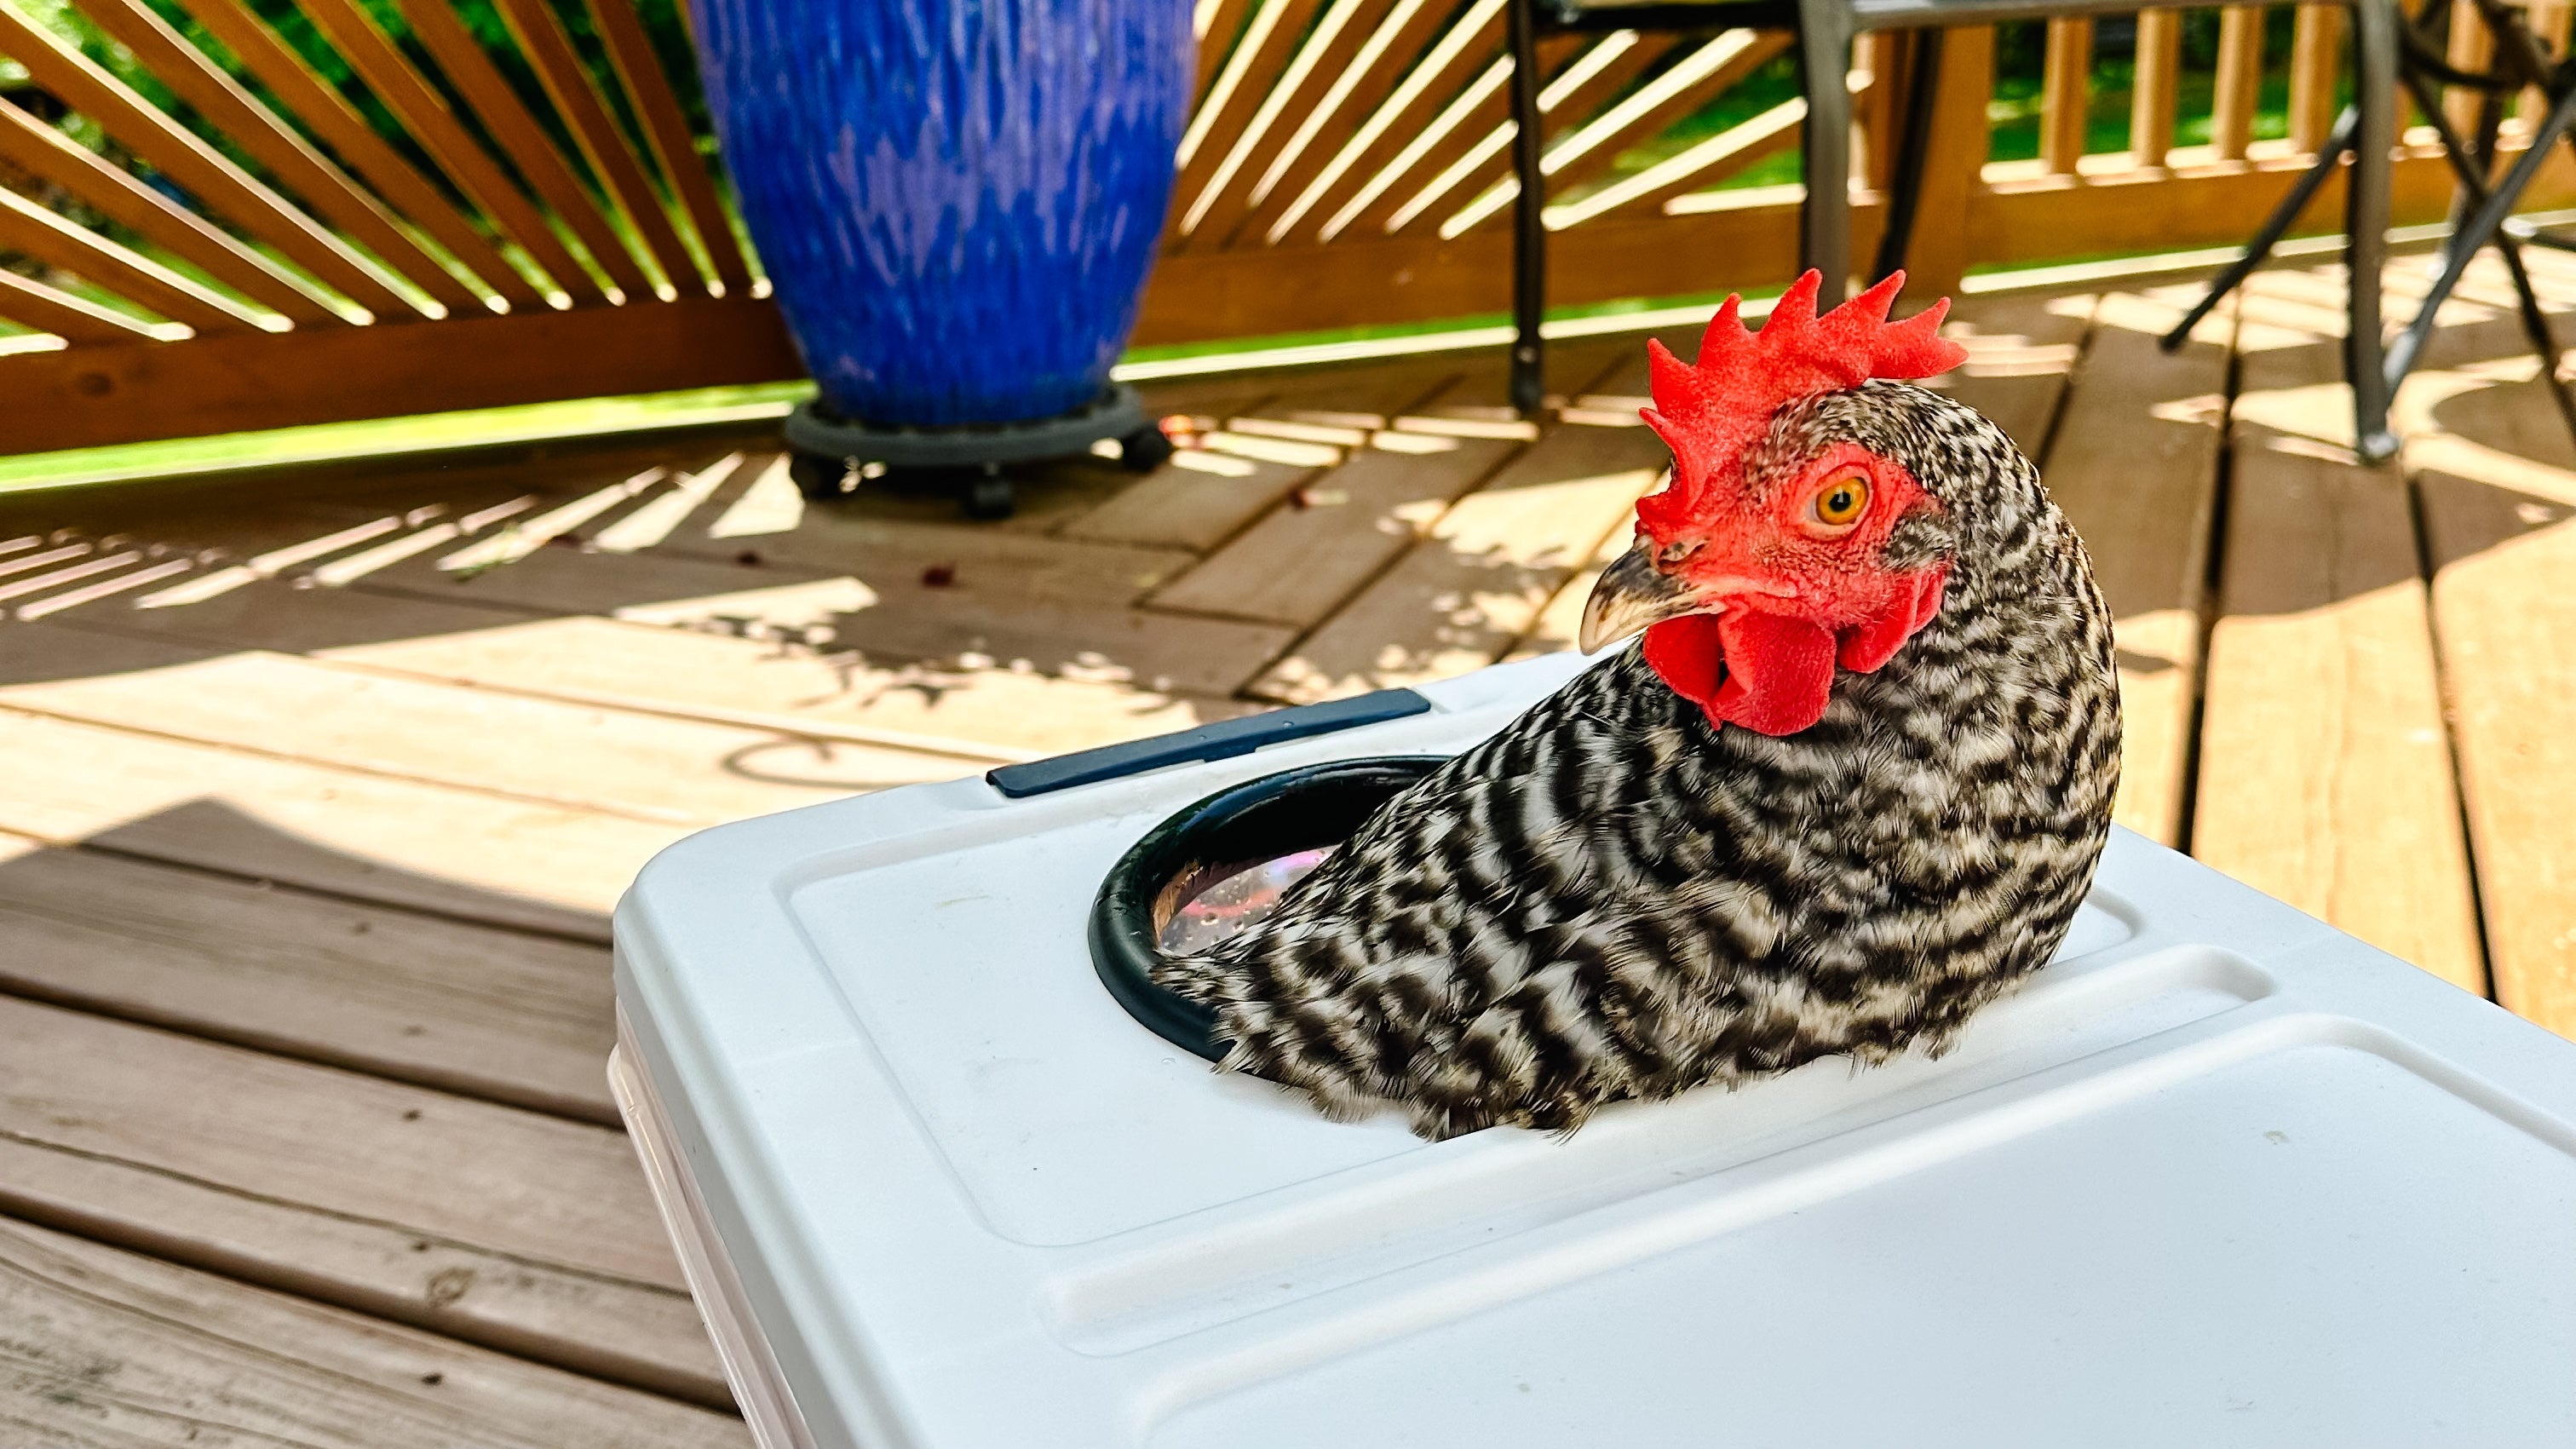
Here’s a step-by-step guide on how to transform a 29qt storage container into a perfect chicken bath!
Materials Needed:
- Storage Container: Project Source Medium 7.25 Gallons (29 Quart) Clear White Tote with Latching Lid
- Rubber Hose: Link to Rubber Hose {Amazon}
Tools Required:
- Box Cutter
- Scissors
- Pencil
- 5.5-6” Round Bowl (I used a plastic jar cover) for tracing a circle
Instructions:
-
Trace the Circle:

Start by using a 5.5-6” round bowl or cover to trace a circle on the inside of the storage container lid with a pencil. Ensure that the circle is centered and evenly drawn.
Tracing accurately is important for creating a hole that is large enough for your chickens to access but not so large where they can jump out. A large hole could also compromise the structure of the lid.
-
Cut the Circle:


Carefully cut out the circle using a box cutter. This process might require several passes -- don't rush or get discouraged. Begin cutting from one side until you are almost through, then turn the lid over and cut from the other side to complete the circle. Take your time to ensure a clean cut.
Cutting with precision is important. Rushing this step can lead to jagged edges, which can be dangerous for both you and your chickens. Patience and steady hands will yield the best results.
-
Measure the Tubing:

Measure the rubber hose to fit around the perimeter of the hole you just cut. It’s a good idea to cut a little extra tubing to allow for overlap. This tubing will act as a protective barrier, ensuring that any sharp edges are covered and making the bath safe for your chickens to use. -
Cut the Tubing:

Using scissors, cut the tubing lengthwise down the middle along its outer curved edge. This will allow you to fit the tubing around the sharp edge of the hole, providing a smooth and safe finish. -
Fit the Tubing:

Finally, fit the cut tubing over the sharp edge of the hole. Ensure it is snug and secure. This will protect your chickens from any sharp edges and make the bath safer and more comfortable for them.
A Note On Safety: It is crucial to ensure that the edges of the cut-out circle are properly covered with the tubing. Chickens, being naturally curious and sometimes frantic, might try to escape through the hole. Sharp edges could lead to injuries such as cuts or scrapes. By covering these edges with rubber tubing, you are providing a smooth, safe surface that will prevent such injuries. -
FINISHED!

Benefits of a DIY Chicken Bath:
-
Cost-Effective:
- Making your own chicken bath is a budget-friendly project for any chicken keeper!
- Making your own chicken bath is a budget-friendly project for any chicken keeper!
-
Customization:
- By making your own bath, you can customize it to fit the specific needs and preferences of your flock. You can choose the size, shape, and depth that work best for your chickens. If you have smaller bantam chickens or silkies, you can use this same guide and choose a smaller container and hole size to ensure they have a comfortable bath experience.
- By making your own bath, you can customize it to fit the specific needs and preferences of your flock. You can choose the size, shape, and depth that work best for your chickens. If you have smaller bantam chickens or silkies, you can use this same guide and choose a smaller container and hole size to ensure they have a comfortable bath experience.
-
Safety:
- The use of rubber tubing to cover the edges of the cut-out hole ensures that the bath is safe for your chickens to use. This reduces the risk of injuries and makes the bath a secure place for your chickens to enjoy.
- The use of rubber tubing to cover the edges of the cut-out hole ensures that the bath is safe for your chickens to use. This reduces the risk of injuries and makes the bath a secure place for your chickens to enjoy.
-
Ease of Maintenance:
- This DIY chicken bath is easy to clean and maintain. You can simply empty, clean and refill for each chicken.
Simple Bath Tutorial:

Once your chicken bath is ready, here’s a simple tutorial on how to use it!
-
Fill the Container:
- Fill the container 2/3 - 1/2 full with fresh, lukewarm, clean water. This depth is ideal for chickens to stand in while allowing their bottom half to soak.
- Fill the container 2/3 - 1/2 full with fresh, lukewarm, clean water. This depth is ideal for chickens to stand in while allowing their bottom half to soak.
-
Add Epsom Salt:
- Adding Epsom salt to the water can provide additional benefits. Epsom salt helps to soothe the skin and can aid in the healing of any minor cuts or abrasions. It also helps to draw out toxins and reduce swelling, which is particularly beneficial if your chicken has any injuries or infections.
- Adding Epsom salt to the water can provide additional benefits. Epsom salt helps to soothe the skin and can aid in the healing of any minor cuts or abrasions. It also helps to draw out toxins and reduce swelling, which is particularly beneficial if your chicken has any injuries or infections.
-
Soak Your Chicken:
- Gently place your chicken in the bath and let them soak for 3-5 minutes. Ensure that the water level is safe for the chicken and that you are monitoring them at all times. This soaking period is sufficient for the chicken to benefit from the Epsom salt and to clean their feathers and skin effectively.
Baths Are Good For:
-
Parasite Control:
- Baths can help in controlling parasites such as mites and lice. The water and Epsom salt combination helps to dislodge and eliminate dirt, poo and pests from your chicken’s feathers and skin.
- Baths can help in controlling parasites such as mites and lice. The water and Epsom salt combination helps to dislodge and eliminate dirt, poo and pests from your chicken’s feathers and skin.
-
Skin & Foot Health:
- Baths help maintain healthy skin. Epsom salt baths can soothe irritated skin and promote healing of minor injuries (such as bumble foot).
- Baths help maintain healthy skin. Epsom salt baths can soothe irritated skin and promote healing of minor injuries (such as bumble foot).
-
Stress Relief & Egg Binding:
- Just like humans, chickens can benefit from a relaxing bath. The warm water and Epsom salt can help to reduce stress and promote relaxation. This is especially helpful if you think your chicken could be egg bound. Helping the hen to relax her muscles can help her pass the egg.
- Just like humans, chickens can benefit from a relaxing bath. The warm water and Epsom salt can help to reduce stress and promote relaxation. This is especially helpful if you think your chicken could be egg bound. Helping the hen to relax her muscles can help her pass the egg.
-
Cooling Down:
- In hot weather, a bath can help your chickens cool down. Keeping cool is crucial for chickens as they are prone to heat stress. Providing a bath can help regulate their body temperature and prevent overheating. Just make sure not to use cold water as this can shock your chickens!
- In hot weather, a bath can help your chickens cool down. Keeping cool is crucial for chickens as they are prone to heat stress. Providing a bath can help regulate their body temperature and prevent overheating. Just make sure not to use cold water as this can shock your chickens!
-
Improved Hygiene:
- Clean chickens are less likely to suffer from infections or illnesses, and they will also produce cleaner eggs.
- Clean chickens are less likely to suffer from infections or illnesses, and they will also produce cleaner eggs.
Note:
Make sure to supervise your chickens when they use the bath at all times to ensure they are comfortable and safe.
Final Thoughts:
Building a chicken bath is a simple yet effective way to enhance the care of your flock. Not only does it provide multiple health benefits, but it also offers a safe and relaxing experience for your chickens. By following the steps outlined above, you can create a practical and safe bath that will keep your chickens happy and healthy!
For more DIY projects and chicken care tips, visit our Tips & Tutorials at Bee Jeweled Coop. Happy chicken keeping!