Building a Multi-Bin Compost System: A DIY Guide
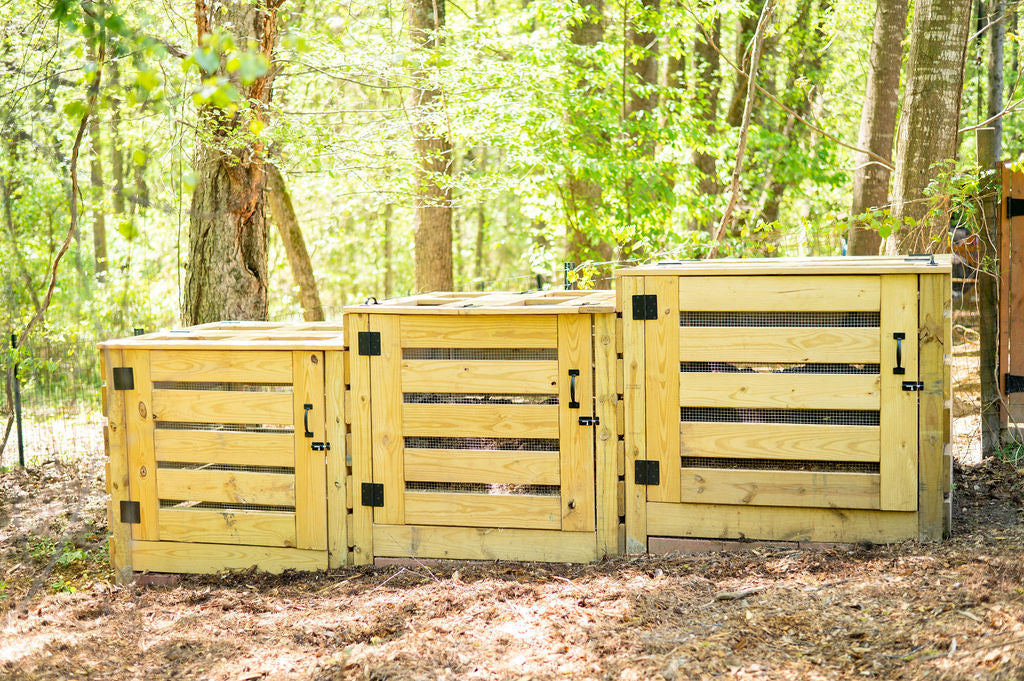
Creating a multi-bin compost system at home is a great way to recycle your kitchen scraps, garden waste AND chicken manure, It also sets up a sustainable cycle of creating nutrient-rich soil right in your backyard. Composting can sometimes seem complex, but with the right setup, it becomes a straightforward process. Using our compost plans will help you through everything you need to know to build a multi-bin compost system that maximizes efficiency and keeps pests out.
If you want to build a compost system just like ours, check out our DIY Compost Bin Building Plans!
Starting with the basics, let’s talk about why a multi-bin system is a fantastic choice. Traditional composting methods can work with just one bin, but adding multiple bins allows you to manage different stages of decomposition, which makes the whole composting cycle faster and easier. With three bins, you can have one bin where fresh materials are added, another for compost that’s breaking down, and a final bin for fully matured compost. This approach provides a constant supply of rich, ready-to-use compost for your garden throughout the year.
1. Preparing Your Space
First things first, find a good spot in your yard. Composting works best when the bins are in a shaded area with good airflow. Make sure it’s accessible too. With the location settled, plan out your materials. We have a materials list in our Compost Building Plans to help you. You’ll need wood for the bin frames (make sure it’s pressure treated to avoid rot), hardware cloth to keep rodents out, and tools like a drill and saw.
Since we’re creating multiple bins, let’s make one important customization: shared walls. Instead of building three individual bins with separate walls, we can simplify the design by having adjacent bins share a wall. This cuts down on the amount of wood needed and makes the whole structure more stable. Plus, it’s easier to build.
2. Building Your First Bin: Setting the Foundation

Start with the foundation. Make sure the ground is level; if you’re working on a slope, you might opt to cement the 4x4 corner posts into the ground like we did. You can also use concrete pavers at each corner for stability and to keep the wood off the ground, which will prevent rot and allow for better drainage.
3. Assembling The Frame

With the foundation and corner posts ready, assemble the frame. We used decking boards for this project because they are pressure treated and cheaper than 2x6s. Always double check measurements, especially if you anchored the posts to the ground. This first bin frame will become the template for the other bins, so taking the time to get this first one right and level is well worth it.
4. Installing The Hardware Cloth (Rodent Proofing)


Install the hardware cloth on the inside of the bins as you go. This is helpful to do before you make the door and lid. This hardware cloth layer will prevent pests from burrowing into your compost. Use a crown staple gun or screws with washers to secure the hardware cloth firmly to the frame, especially on the bottom and shared walls. This pest-proofing step is a little tedious, but it’s well worth it for keeping rodents and insects out of your compost.
5. Building The Door And Lid

Next, build your front door and lid. Install hardware cloth on these as well.
Our unique lid is designed to fold up towards the back of the compost. This makes accessing the compost easier. A typical lid would be extremely heavy to lift each time you need to access the bin. With this design, you only need to lift the front section of the lid to dump your fresh compost.

6. Constructing the Second Bin Using the Shared Wall

With the first bin complete, move on to the second bin. You will start with the shared wall that will separate the first and second bins. For those using our plans, it’s fairly straightforward to adjust the build to eliminate one wall (but not the 4x4s) where the bins will connect.
You will anchor the 4x4 posts or create the leveled foundation for them. Secure the first 2 posts next to the shared wall. We used lag bolts to secure these 4x4 posts to the 1st bin. Then, place the remaining corner posts, build your back wall and then the side wall.
Next, build the door and the lid exactly as you did for the first compost.
7. Building the Remaining Bins

With the first and second bins connected by their shared wall, move on to constructing the third bin following the same process.
Once the framework is complete, give it a final check to make sure everything is secure and level. Compost can be surprisingly heavy, especially when it’s damp, so sturdy construction is crucial. Reinforce any areas that seem weak and check for gaps in the hardware cloth.

Let’s Get To Composting!
With your compost system built, it’s time to start composting! The multi-bin system allows you to cycle compost through different stages of decomposition without disturbing the materials too much. Start by adding fresh materials to the first bin—things like vegetable scraps, coffee grounds, and chicken manure work well. Avoid adding meat or greasy foods, as these can attract pests. As the compost starts breaking down in the first bin, aerate it regularly to speed up decomposition.

Two Methods for Managing Your Compost:
1. Rotating Compost (most popular)
- How It Works: With this method, you shovel compost from Bin #1 into Bin #2 after about 6-12 months. After another 6-12 months, move the compost into Bin #3. This rotation allows each bin to serve a different stage of decomposition, ensuring a continuous supply of fully matured compost.
- Benefits: This method allows for quicker composting cycles, as material moves through different stages in different bins. It’s especially effective for active composting with consistent new material additions.
- Effort Required: Moderate. You’ll need to turn or aerate the compost periodically, especially when moving it between bins, to keep it breaking down effectively.
2. Single Bin Per Year Method (what we do)
- How It Works: Add compost material to Bin #1 continuously for one year. At the end of the year, stop adding new material and let it mature while using bin #2 for the second year and bin #3 for the 3rd year. By the time you are using bin #3, bin #1 will be fully composted and ready to use for gardening.
- Note: During this time, you’ll need to stir and aerate the compost regularly to encourage even decomposition.
- Benefits: This method requires only one active bin per year, which simplifies management. After the compost matures, it’s ready to use in your garden without the need for transferring between bins.
- Effort Required: Minimal, but regular stirring is essential. Turning the compost every month is key to avoiding compaction and ensuring oxygen reaches all layers for efficient breakdown.
Maintenance and Troubleshooting
To keep your compost system running smoothly, remember to maintain a good balance of “greens” (nitrogen-rich materials like vegetable scraps) and “browns” (carbon-rich materials like dried leaves or cardboard). This balance will prevent an unwanted compost scent and help it break down efficiently. Regularly check the moisture level as well—it should feel like a damp sponge. If it’s too dry, add a bit of water; if it’s too wet, add more browns.
Every few weeks (we personally try for once per month), turn the compost in each bin to keep it aerated. Compost needs oxygen to break down properly, and turning it helps speed up the process. If you notice that the compost isn’t breaking down as expected, or it has a strong smell, it’s usually an indicator that the green-to-brown ratio is off or it’s not being aerated enough. Simple adjustments can get it back on track.
Enjoying the Results
The real payoff comes after 6 months to 1 year when you open up the bin and find beautiful, dark, earthy compost ready for your garden. This compost will enrich your soil, improve water retention, and add vital nutrients that support plant health. It’s rewarding to see the transformation of waste into something so beneficial, especially knowing it was done sustainably and right at home.
This multi-bin compost system is durable, efficient, and designed to keep pests out while allowing you to continuously produce high-quality compost. By following these steps and customizing the setup to your needs, you can create a composting system that fits perfectly into your backyard and your routine.
If you’ve completed your multi-bin compost system, we’d love to see how it turned out! Share your photos and experiences, and let’s inspire others to start their own composting journey.
Composting can sometimes seem complex, but with the right setup, it becomes a straightforward process. Using our compost plans will help you through everything you need to know to build a multi-bin compost system that maximizes efficiency and keeps pests out.


