Winterizing Our Chicken Run with Corrugated Greenhouse Panels: A DIY Guide
Chickens originate from the jungle where they are used to warm climates. While they can tolerate cold weather, they thrive in warmth and appreciate a cozy environment. This is why it's important to take measures to winterize their living space and make sure they stay comfortable throughout the colder months.
One of the best ways to keep our chickens cozy is by winterizing the chicken run, creating a sheltered environment for your flock. In this article, I'll share the process of adding corrugated greenhouse panels to the sides of your chicken run to protect your chickens from winter winds and other elements -- an idea that was inspired by my friend Gina over at @lifeonsweetlyfarm ♥
I've also included a quick video that gives a visual demonstration of the process—you can watch it below!
Watch the Video: How To Cut + Install Corrugated Greenhouse Panels
UPDATE 2025 INSTALLATION VIDEO: How to wash your panels from last year + install with zip ties!

Why Winterizing Your Chicken Run Matters
Chickens are generally hardy creatures, but they still need a little extra help to be comfortable during winter. Here are some reasons why taking steps like adding greenhouse panels to your run is worthwhile:
- Temperature Management: While chickens can tolerate cold temperatures, drafts and exposure can lead to stress, frostbite, or even decreased egg production.
- Protection from Elements: Shielding your chickens from wind, rain, and snow helps keep their feathers dry. Wet feathers lead to chilled chickens, and no one wants that.
- Peace of Mind: Knowing that your chickens have a protected space means less worry during cold snaps and storms.
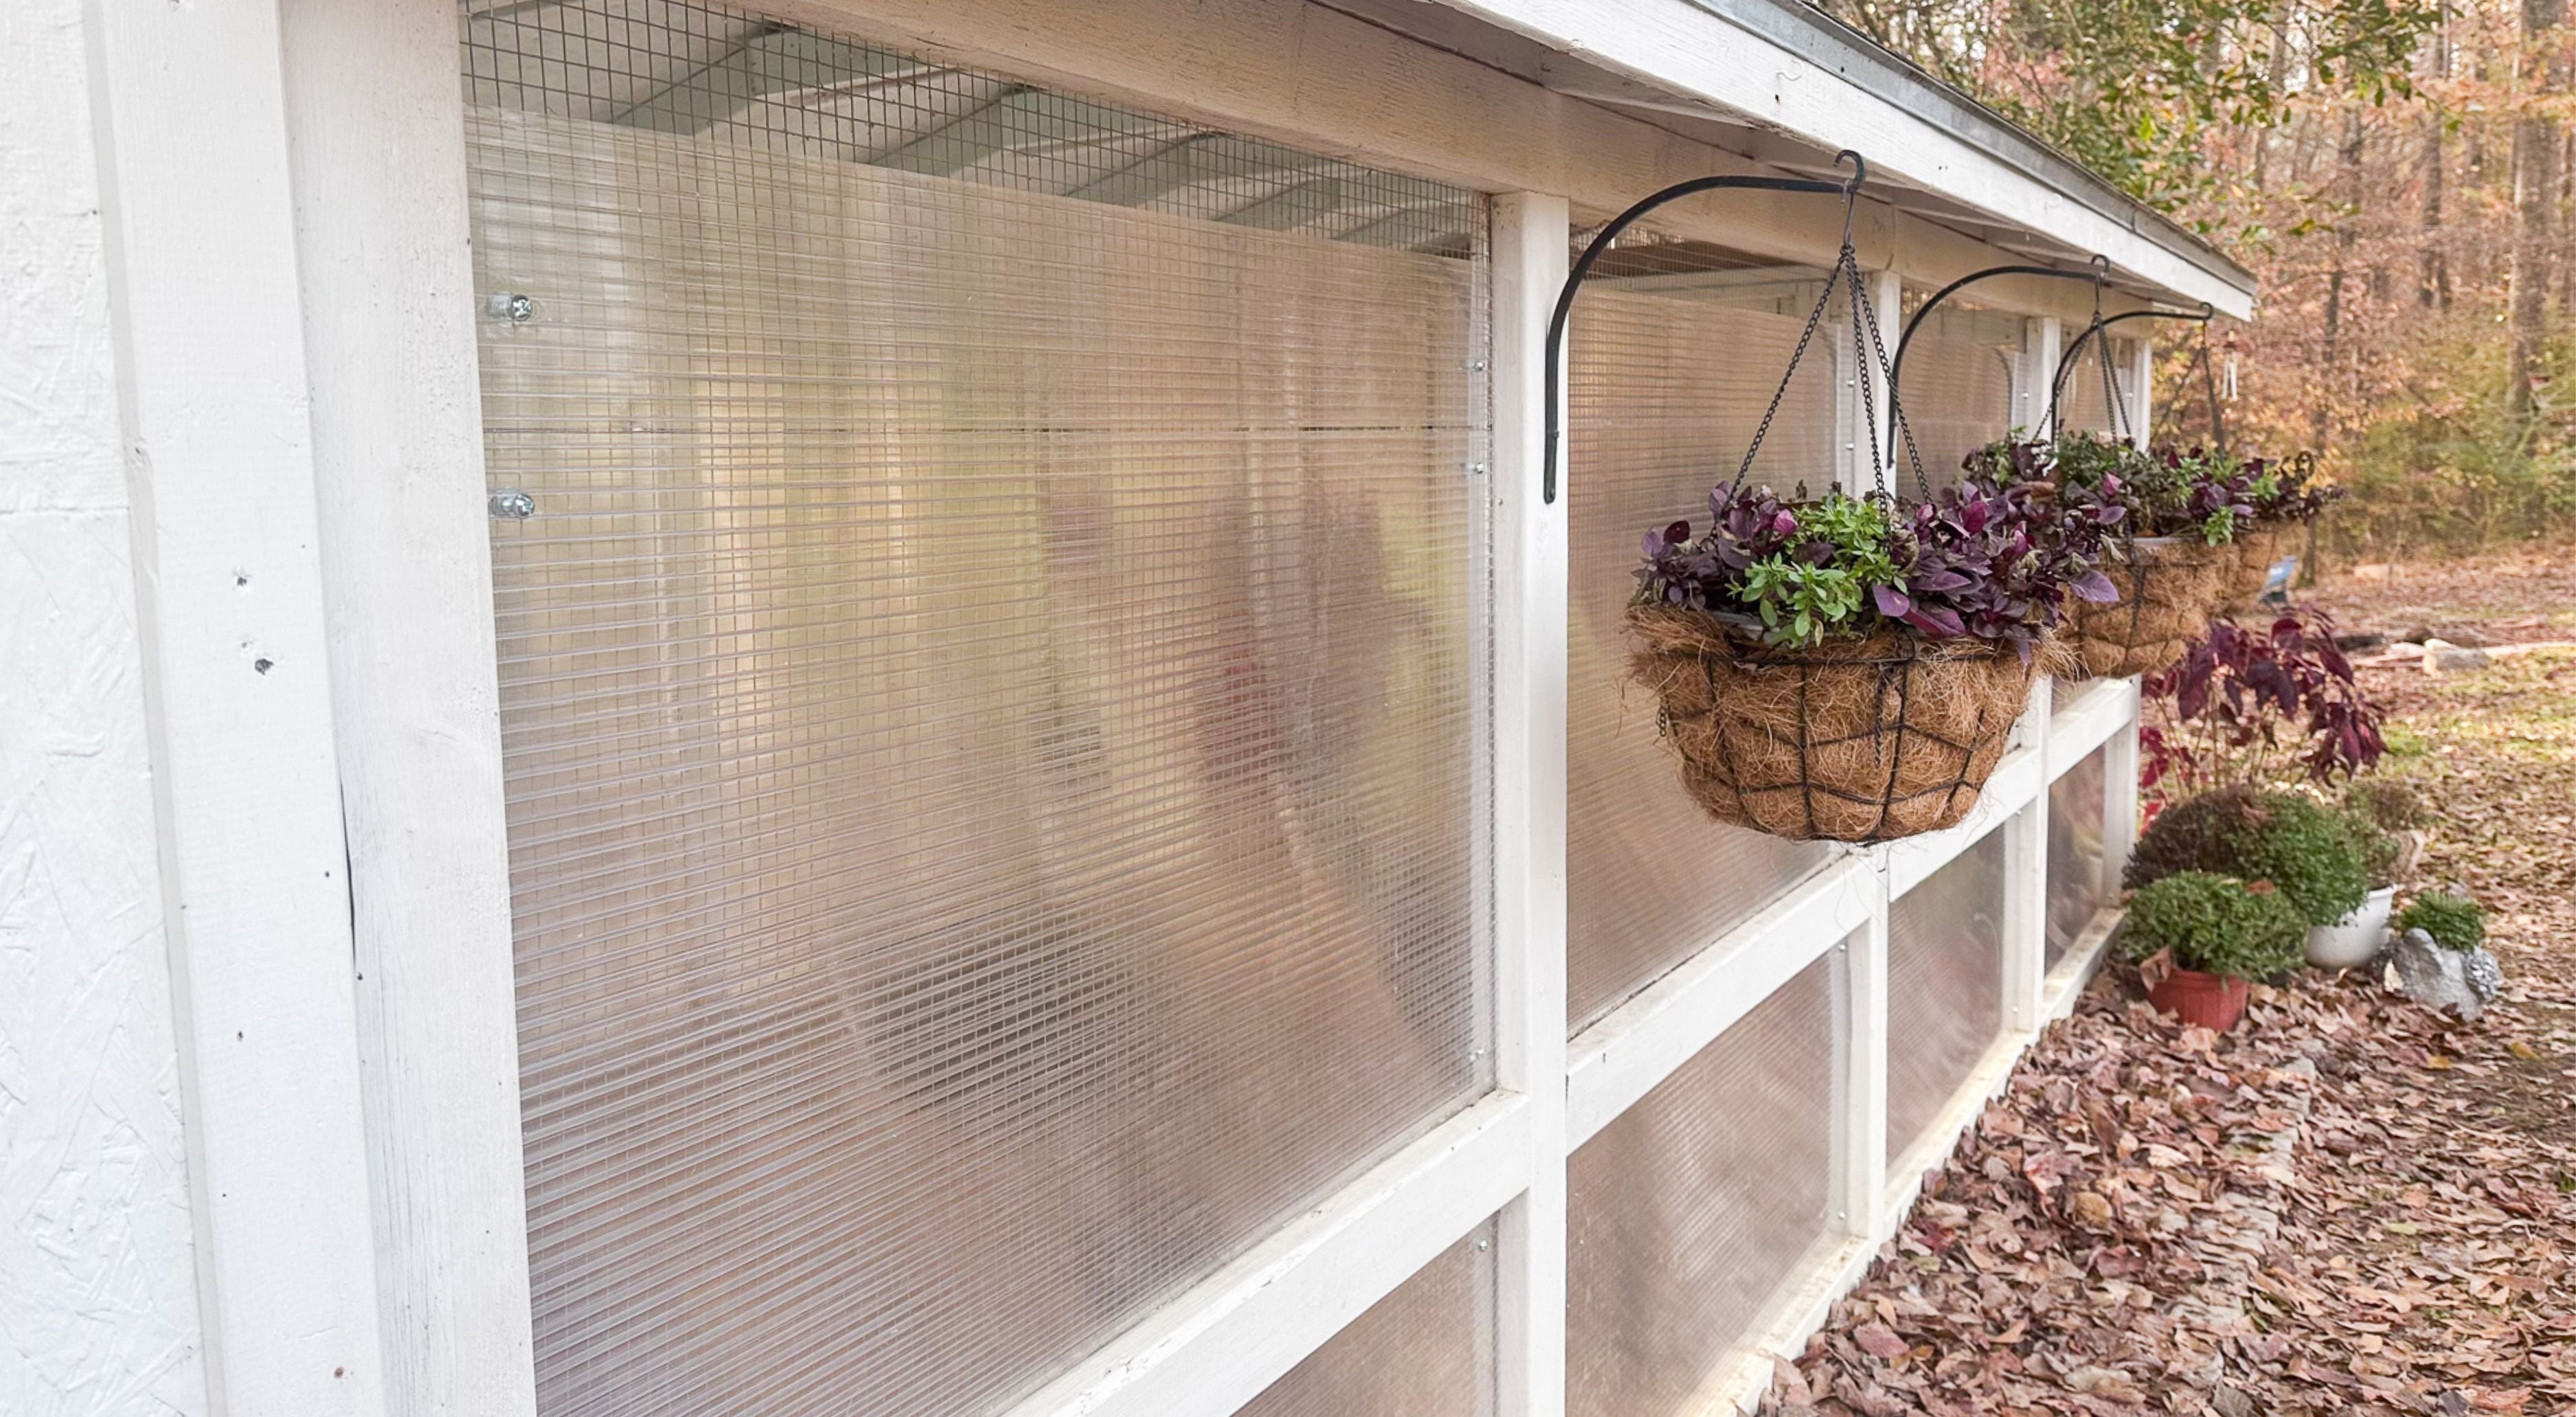
When we started thinking about how to winterize our chicken run, we wanted something that was better for the environment than cheap, disposable plastic sheeting. That’s why we decided to use corrugated greenhouse panels. They’re sturdy, allow plenty of light through, and create a snug enclosure for the winter months.
Tools and Materials Needed
- Corrugated Greenhouse Panels 4' x 2' x 0.32" (18 panels total—1 pack of 12 and 1 pack of 6— for our standard size 4x8 Coop & Run plans)
- Update 2025: Zip ties are easier AND safer! (for securing panels) or Bolts and washers
- Box Cutter
- Measuring Tape
- Drill and Drill Bits
- Marker

Choosing the Right Materials
The panels we chose are lightweight yet durable corrugated greenhouse panels. These are made to endure the elements while letting natural light through, keeping our chickens’ environment bright during the short, gray days of winter. After browsing several options, these stood out because:
- They are transparent, allowing maximum sunlight exposure.
- They are made of strong polycarbonate, which is both lightweight, impact-resistant and we can use them year after year. This is also the same durable material we chose for The Coop Scoop™!
- They are easy to install with minimal tools.

Step-by-Step Installation
1. Measure Your Chicken Run
Before buying materials, it’s important to measure each side of your chicken run that you’re planning to cover. Measure carefully to determine how many panels you'll need and how much coverage you’re looking to achieve. Do you want full coverage or only windward sides?
We opted for covering ALL sides of the run—leaving a 2.5" gap at the top open for ventilation—because even in winter, good air circulation is essential. Moist air can lead to respiratory issues, so balance is key.
2. Cut the Panels (if needed)
Our panels came in fairly large sheets, so we needed to cut them down to size. You can easily use a box cutter for this, but be sure to measure twice and cut once! You want to avoid having any gaps or poorly fitting pieces, which could let in drafts.
watch this video
3. Position the Panels
Once everything was cut and prepped, I positioned the panels along the sides of the run. I aligned each one carefully to make sure they were level and didn’t leave any gaps at the bottom or along the frame.
4. Pre-Drill Holes
After positioning the panels inside the run frame, I made sure that the panels were properly aligned to ensure accurate placement. Then I pre-drilled holes in the panels. This helped to ensure the holes were drilled in the correct location to properly secure them to the hardware cloth.
5. Seal the Edges (Optional)
This is something I opted not to do but you may want to consider it. A weather-resistant sealant can be applied to the edges to prevent moisture and dust from getting into the corrugated flutes. I wanted the option to wash these panels when I take them off in the spring. Sealing these spaces might create issues with actually trapping water inside instead of keeping it out if the edge is not properly sealed.
6. Test the Panels for Stability
Once the panels were installed, I gave them a little "stress test" to make sure they were securely in place. You don’t want a windy winter storm to come along and blow them off, so it’s best to double-check. I found that giving each bolt a final tightening helped keep the panels from rattling in the wind.

Benefits of Using Greenhouse Panels for Winterizing
1. Increased Warmth
The panels act like a windbreaker, blocking the cold winter air from blowing through the run. Chickens are naturally insulated by their feathers, but they can still suffer from stress and chill if exposed to strong winds for extended periods. By blocking the wind, we’re able to create a micro-climate in the run that’s significantly more comfortable.
2. Less Time Spent 'Cooped Up!'
Creating a cozier run environment means less time spent in the coop to stay warm. In our setup, the run is easier to clean and maintain with The Coop Scoop™ and sand substrate. The more time the chickens spend in an easier-to-clean environment, the better and easier it is for us to take care of them!
3. A Dry Environment
Winter weather often brings a lot of moisture in the form of snow or rain. The greenhouse panels will do an excellent job of keeping most of that moisture out of the run. A dry run means healthier chickens—no one wants their chickens standing in wet, cold substrate during the winter months.
4. More Natural Light
One of the biggest advantages of using greenhouse panels instead of tarps is that they let in a lot of natural light. Chickens need daylight to stay healthy and keep laying eggs, so having the run still bright and sunny during the day is a huge benefit.
Additional Tips for Winterizing Your Chicken Run
- Bedding: Don’t forget about extra bedding in the coop. Hemp bedding works well for added insulation on the coop floor and it is fairly easy to spot clean.
- Ventilation: Always leave some room for ventilation. A fully sealed coop and run can cause moisture build-up, which is a major health risk for chickens.
- Check Regularly: Inspect the panels throughout the winter, especially after windy days or snowstorms. Reinforce any loose bolts and clear snow off the panels if it starts to pile up.
FAQs About Winterizing Your Chicken Run
Q: Do I need to add heat to my chicken run or coop?
No, in most cases, adding supplemental heat isn’t necessary. Chickens are surprisingly good at keeping themselves warm if they’re out of the wind and have dry conditions. Adding heat can even be risky if it malfunctions or if chickens become too reliant on it.
Q: Will the panels make the run too hot on sunny winter days?
The winter sun isn’t strong enough to create overheating issues, especially when temperatures are low. However, if you have an unusually sunny, warm winter day, you could always open a panel or create a vent to ensure good airflow.
Q: Should I cover the roof of the run as well?
Chickens should always have access to a covered run space. This not only helps them escape the elements but also provides a safe place to shelter in case concerning viruses enter your area, like avian influenza. Just be sure that whatever cover you use is strong enough to handle the snow load-- tarps are not the best option.
Final Thoughts: A Cozy Winter Ahead
Winterizing your chicken run doesn’t have to be a huge or complicated project. Adding greenhouse panels is an efficient and effective way to shield our chickens from the worst of the winter weather while still allowing them to enjoy natural sunlight.
If you’re considering winterizing your own chicken run, I highly recommend giving corrugated greenhouse panels a try. They’re lightweight, relatively easy to install, and make a big difference in creating a more hospitable environment for your flock.
I hope this guide helped you in your journey toward a more comfortable winter for your chickens. Don’t forget to check out the video for a visual walkthrough of our process! And if you have questions or your own winterizing tips, share them in the comments below—let’s keep our chickens cozy together!
Watch Our Quick Winterizing Video Here
Note: This post contains affiliate links. If you make a purchase through these links, I may earn a small commission at no extra cost to you. Thanks for supporting our coop and helping to keep the chickens warm!

