
Article: DIY: Installing a Water Line for the Garden & Chicken Coop

DIY: Installing a Water Line for the Garden & Chicken Coop
We installed an outdoor water line to make watering the garden and caring for the chickens easier. Here’s the story of how we ran water from the house to the garden and chicken coop, what materials we used, and what we learned along the way.

Running Water to the Garden + Chicken Coop
There are some projects that feel small when you first start talking about them, and then somehow you find yourself standing outside the foundation of your house, holding PEX, PVC, fittings, valves, and wondering how in the world one little water line turned into a whole engineering project.
This was one of those projects.
For years, we’ve dragged hoses across the yard to water the garden, fill chicken waterers, rinse things off, and keep up with all the little outside chores that come with having a garden and backyard chickens. It worked, technically, but it was not exactly convenient.
So this year, we finally decided it was time to run water out to the garden and chicken coop.
The goal was simple: get a dedicated water line outside so we could have easier access to water where we actually use it.
The process? A little less simple.


Why We Wanted Water Near the Garden and Coop
If you garden or keep chickens, you know how quickly outdoor water becomes part of your daily routine.
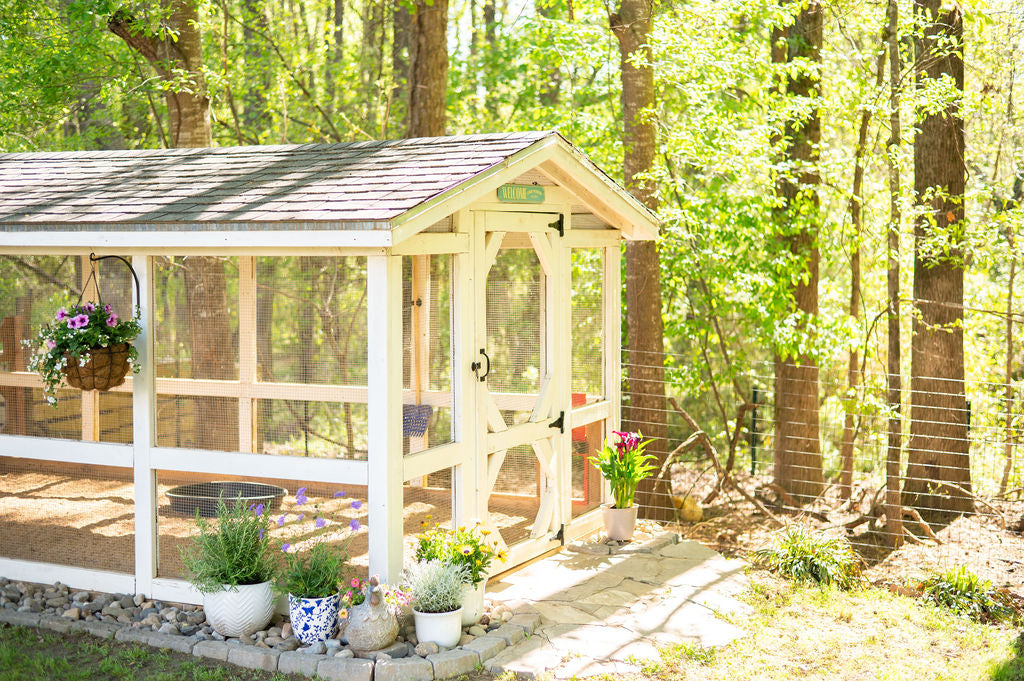
In the garden, we’re watering raised beds, seedlings, herbs, vegetables, and newly planted areas that need consistent moisture. At the coop, I'm filling chicken waterers, rinsing things off, and watering our hanging plants.
Dragging a hose 100ft from the house every time we needed water was a big inconvenience. So is walking back and forth with jugs across the lawn.
We wanted a cleaner setup that would make our outdoor chores easier, especially during the growing season when watering becomes a daily thing.
“Everything is figureoutable.”
Step #1: The Plan
Starting From Under the House
Our existing water line after the pressure tank under the house was 3/4-inch PEX but, since we were running water at least 100ft, we wanted to run 1-inch pipe outside for the irrigation line.
That meant we had to figure out the best way to transition from the existing 3/4" water pipe to the new 1" water line running outdoors.
The idea was:
Start with the existing 3/4-inch PEX under the house, tee off that line, transition to the outdoor pipe size we wanted, and then run the line out toward the garden and chicken coop.

This drawing is not meant to be a universal plumbing plan for every property. It is simply the layout we used for our project based on our house, our existing water line, and where we wanted our garden and chicken coop spigots to be.
If you are doing a similar project, make sure to check your local plumbing code, use fittings rated for your water line, and choose materials that are appropriate for exposed, buried, or pressurized water applications.
Our Irrigation Layout
Before we started cutting pipe and connecting fittings, we sketched out the basic layout for how we wanted the water line to run from the house out to the garden and chicken coop.
The existing line under our house was 3/4-inch PEX, but we wanted to run a larger 1-inch PEX line outside so we could carry water out to multiple spigots. From there, we planned to reduce back down to 3/4-inch PEX at each spigot connection.
The basic setup was:
- 3/4-inch PEX under the house
- 1-inch to 3/4-inch SharkBite reducer
- 1-inch SharkBite valve
- 1-inch PEX running out of the house
- 1-inch 90-degree SharkBite elbow outside the foundation
- 1-inch PEX main line running underground/out toward the garden and coop
- 1-inch SharkBite tee fittings to branch off to different spigot locations
- 1-inch to 3/4-inch SharkBite reducers near the spigots
- 3/4-inch PEX connecting to each spigot
We also used 1 1/2-inch PVC as a protective sleeve where the PEX comes out of the house and turns downward. The PVC isn’t carrying water in this setup. It’s there to help protect the PEX where it is exposed.
This drawing made the whole project easier because we could see where each fitting needed to go before we started working outside. It also helped us figure out where we needed reducers, where the valve should be accessible, and how we wanted the line to split between the garden and chicken coop.
One thing I’m really glad we thought through was the spigot placement. Instead of running one water line to one location, we planned for three separate spigots, which gives us more flexibility. And it really wasn't too complicated to to.
One spigot for each side of the garden (#1 & #2) and one spigot on the outside of the fence next to the chicken coop (#3).


I've curated a list of tools and supplies we used for this project.
Click HERE to visit my Lowes Project List.
Step #2: Getting The Pipe Outside
Drilling through the brick and concrete foundation requires a masonry bit and a hammer drill.
We used the masonry bit to drill small holes in a circle through the brick and then knocked the hole out with a chisel.
Once we got to the outside of the house, we wanted the line coming out of the foundation to be protected.
In our layout, the 1-inch PEX exits the house, runs through a 1 1/2-inch PVC sleeve, then turns downward with a 1-inch 90-degree SharkBite elbow, and continues into the ground through a second section of 1 1/2-inch PVC.
We do not want any part of the water line to be exposed. UV rays and the occasional “oops” from yard equipment could damage it quickly. This PVC sleeve sleeve adds protection where the pipe comes out of the house and down into the ground.
Note: We will cover this section with foam insulation in the winter to prevent it from freezing.
If you're doing a project like this one, make sure anything exposed outside is rated for outdoor use or properly protected.


Step 3: Digging The Trench
Digging the trench was by far the longest and hardest part of this entire project. Since we live in the South, the recommended burial depth for our water line was around 12”, but this can vary depending on your climate and local building codes. Be sure to check your local recommendations before digging.
There were definitely moments when we questioned our decision to do this all by hand. If we had needed to go deeper, we absolutely would have rented a trencher or other heavy equipment. But for our setup, we committed to the DIY route and tackled it shovel by shovel.
One thing that helped was ensuring that the trench was relatively straight. This gave the 1” PEX enough room to curve naturally without putting stress on the pipe. We also removed large rocks and sharp debris before laying the line to help protect the PEX long term.


Step 4: The Outside Connection Valve Setup
Once we came to the part where we needed to split off to the first spigot, we assembled our first connection.
We wanted the valves outside to be accessible, not buried.
That way, if we need to make repairs or adjust anything later, we are not digging around trying to find buried fittings.
In this particular setup, there is a 1" water line coming in, the other 1" line going to the chicken coop, and a 3/4" water line going out to the spigot.
We made sure these fittings were protected with a valve box.


Step 5: Protecting the Above Ground Pipe at Each Spigot
For the sections of pipe that came above ground at each spigot, we wanted something that looked clean but also protected the water line.
To do this, we used 1 inch PVC pipe as a protective sleeve. The water pipe itself runs through the inside of the PVC, so the PVC is not carrying water. It is simply there to protect the line where it comes up out of the ground.
To make the setup look a little more finished, we painted the PVC black. It instantly gave the spigot area a sleeker, more intentional look instead of making it feel like random plumbing sticking out of the ground.
Once the water line was threaded through the PVC, we attached the SharkBite spigot at the top. This gave us a clean, sturdy above-ground connection point without leaving the water pipe exposed.
After that, we secured the PVC to a 4x4 post using PVC brackets.
This was one of those small finishing details that made the whole project feel much more polished.

Project Budget + Expenses
The total cost for this project was about $600.
The most expensive piece was the 100-foot roll of water line, which made up a big portion of the budget. We chose PEX A because it is flexible, durable, and better suited for long runs where you need the pipe to curve and move a bit through the trench. Since we were running water all the way out to the garden and chicken coop, we wanted something that felt more like a long-term setup instead of a quick fix.
And honestly, I’m really glad we slowed down and thought through the materials before buying everything.
At one point, we almost spent $300 just to bury a hose.
Ah!
That would have technically gotten water out to the garden, but it would not have been the same kind of permanent, protected setup. For not that much more, we were able to install an actual water line with spigots, shutoff access, protective PVC sleeves, and a much cleaner finished look.
So while $600 was definitely not nothing, this felt like one of those projects where spending a little more upfront made a lot more sense than doing it halfway and wishing we had done it differently later.
What We Learned
The biggest lesson from this project is that plumbing always seems simple until you start laying out the actual fittings.
A straight line on paper becomes a tight corner in real life. A “quick connection” turns into figuring out pipe sizes, adapters, valves, angles, and whether the material can actually bend where you need it to bend.
Here are a few things we learned along the way:
Plan the full route before buying fittings.
It helps to know exactly where the pipe is coming from, where it is going, where it needs to turn, and where you want valves or shutoffs.
Be OK with changing direction when things don't work.
We had to do this often :)
PEX is flexible, but then again, it's not.
It can bend, but tight turns need fittings. We did learn that warming the pipe up helped it to bend a little more.
Protect exposed lines.
If pipe is coming out of the house or running outdoors, think about sunlight, freezing, damage, and long-term access.
Keep important valves accessible.
Valves are much more useful if you can reach it later.
Would We Do It Again?
Absolutely.
Even though this project took more thinking than expected, running water to the garden and chicken coop is an upgrade that feels incredibly practical.
I've been waiting to do this for years!
It is not the prettiest project, but it is the kind of thing that makes my chickens chores easier, especially when I am trying to keep up with a garden, chickens, content projects, and everything else happening in this busy life.
Cleaner chores, easier watering, fewer hoses dragged across the yard.
And my coop plants get watered instead of being neglected.
That feels like a win to me.
I put together a full list of the materials we used for this project in my Lowe’s storefront, including the fittings, pipe, valves, and irrigation pieces we grabbed along the way. If you’re planning to run water to your garden, chicken coop, or another outdoor space, hopefully this helps make your project a little easier.
Click HERE to visit my Lowes Project List.

The author : Alysha Whitfield
Alysha Whitfield is the founder of Bee Jeweled Coop, where she shares real-life chicken keeping, gardening, DIY projects, and practical coop care from her own backyard. As the creator of the Coop Scoop™ and Bee Jeweled Coop building plans, Alysha is passionate about helping other chicken keepers create cleaner, more functional, and beautiful spaces for their flocks.


